WALTER SPIERINGS

Dutch Holographic Laboratory BV

Eindhoven, Los Paises Bajos

P.P.Q.M. SOONS

Volcan, Panama

RESUME:

-We describe the process how to reconstruct the 3D data in the image in the Shroud of Turin with Holography.

-Copies of the negatives of Giuseppe Enrie of 1931 are digitized and enlarged to improve the details.

-The gray levels in the Shroud data were then translated into depth data.

-A sequence of up to 625 images was generated and these were combined with our Holoprinter   into a 3D image of the Shroud.

Introduction:

In 1977 John Jackson and Eric Jumper analyzed photographs of the Shroud. In their experiments they used a microdensitometer to follow the ridge lines to obtain a graphic record of the relationship of the image intensity of the cloth-to-body distance. They were able to conclude that Vignon’s hypothesis (that the image on the Shroud varies inversely with the cloth-to-body distance) was correct. They then subjected the image points of the Shroud photos to VP-8 image analysis One of their findings was that their process resulted in an anatomically perfect 3D model.

Since then more 2D to 3D conversion processes have been described (Tamburelli, Balossino).

In our initial tests we used a commercial available tool. From the Shroud data we extracted a gray scale height image and used this to generate a 3D image of the Shroud.

We made several views of this 3D model and we generated an anaglyph image which made viewing in 3d possible using red and cyan glasses.

This convinced us to continue, and more sophisticated methods were developed.

A virtual camera moves in a horizontal line past the 3D model. Between the center view and the most left and right image all the other images (623) are interpolated.

These sequences are used in the DFCH  Holoprinter developed at the Dutch Holographic Laboratory in Eindhoven, the Netherlands.

For the large size holograms (100×50 cm and 200×100 cm) we chose the one step process, because it is an easier possibility to produce large size holograms.

Holography process

Theory:

The theory which we have developed (1,2) is different to the existing theories. We compare making a Computer Generated Hologram (CGH) or a Multiple Photo Generated Hologram (MGPH) with making a Traditional Hologram (TH) of the same object. Because in the end we want the CGH to look the same as a Traditional Hologram (TH) of that original object.

By using a reversed reasoning we were able to develop this theory.

The theory describes the exact recording geometries. Of course this way of recording is in itself astigmatic.

The vertical parallax doesn’t change. The horizontal parallax does. Using a long enough H1-H2 distance takes care of this problem and the astigmatic effect is not noticeable.

We will summarize this theory (MPGH) see also.

Theoretical principle of geometrical method for artificial holography

To perceive true perspective in an artificial hologram we made an analogy with a traditional hologram of an object. When this hologram is illuminated with its conjugated reference beam the recorded object focuses 3D in space.

If we slit a hologram, by cutting the hologram up, we could join these slits together and we would have of courses the same hologram. Of course, if the slits are not adjacent to each other but a little apart the object would become distorted. Imagine we reconstructed the hologram of the object with the conjugate wave. If we only illuminate a small dot of the hologram the object will be reconstructed. It doesn’t focus in space though and we can project this image on a screen at any distance. A dot adjacent to the first dot will give a flat slightly different perspective of the object.

Is it then possible to reverse this process, to make a 3D hologram using only 2D images (without the vertical parallax)?

Therefore we divided the hologram in 150 dots on a horizontal line. Instead of projecting the images produced by every dot on a screen, we use photographic paper instead. If we holograph every picture that is on the photographic paper in the right dot, we could record the same hologram as before and we reversed the process.

Instead of using photographic paper we can make slides of the real object at the position of the different slits and project these on a transparent screen. The slides have to be taken in such a way that the projection of these slides will give the same result on the screen as the photographic paper did. So how can we determine how to take the right perspectives and what parameters and involved?

The new approach:

We use the analogy with a traditional hologram as explained before.

We will look at two methods.

1)      We can make pictures of a real 3D object.

2)      We have a 3D object in a computer and a software camera makes the slides. The slides are then visualized on the computer screen. To transfer these pictures to the holographic setup we make photos of the screen (1:1)

Alternatively we use a LCD screen in the setup.

We use the set-up proposed by King de Bittelo, Benton, Newswanger, Molteni.

The Recording:

First we discuss the recording of an object point and show that the 3D location is transferred to a deviation on the slide, relative to a previous slide in the sequence. This deviation is the only depth cue during the process and describes the 3D object. We will define this deviation during the conversion process of object till hologram.

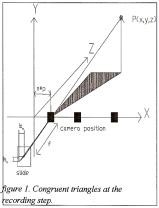
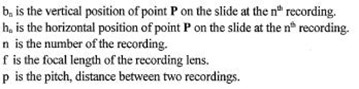
A point P (X,Y,Z) in space will be focused on the slide at a point P (b,h) the center of the slide is the origin, see fig.1.

The relations between these two points are

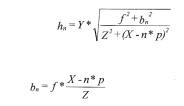
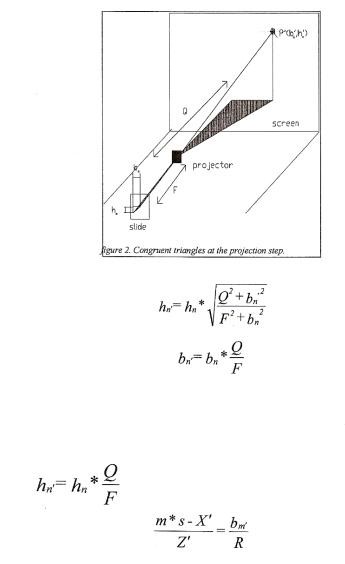
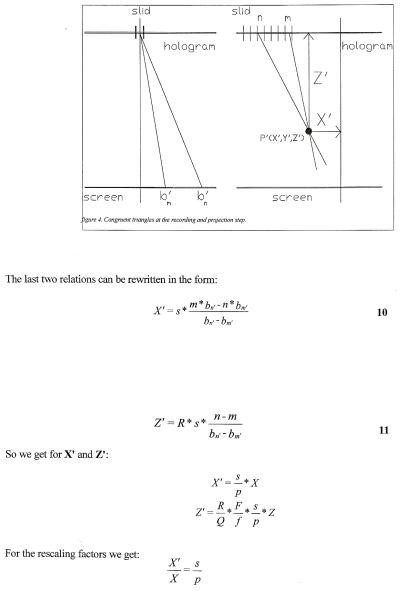
When the slides are projected on the screen (see fig 2.) the pictures will be rescaled by a certain factor according to:

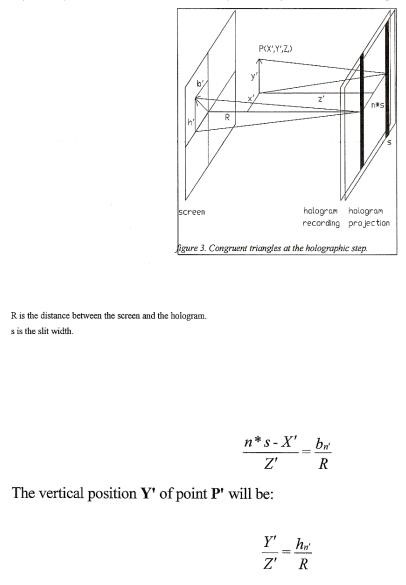
As explained before all slides will sequentially be recorded on the right slits. The point we recorded P (X,Y,Z) will focus at locations P (X,Y,Z) behind the hologram. See fig. 3.

In the first section we have presented the calculations concerning a recording on a straight track, perpendicular to the subject. Now we discuss the geometry and calculations for a circular track recording. In the first case the holographic plate was moving and the slit was on the optical axis. Now the holographic plate has to be fixed and the slit will be moving. The geometry is as shown in figure 5:

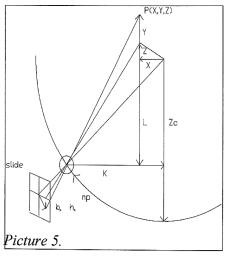
All the parameters are the same, except for the pitch that now is a given in rad (p rad)

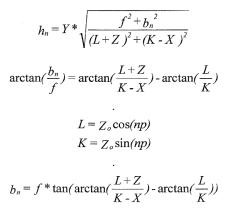
From figure 5 we can derive the next equations by congruent triangles:

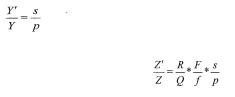
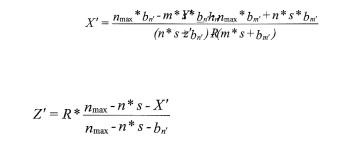
As we have seen before, the point (P ba, Ba) will be rescaled on the screen by a factor Q/F. With the projection of the hologram, the original point P (X,Y,Z) will result in the point P (X,Y,Z) that can be calculated as follows:

We have written an interactive computer program to calculate the right geometry for an undistorted MPGH.

LCD Experiments:

The long term goal is to let the computer address a printer after which the hologram is printed. Obviously we need an electronic display interface between the CAD system and the hologram printer, to be able to address the printer directly. Therefore the Dutch Holographic Laboratory has approached Philips Corporation for assistance in the interface between the computer screen and the holographic projection screen, by using a very high resolution LCD screen. This would of course result in a perfect registration of the different views.

The LCD screen used was a black and white active matrix type measuring 6 inch diagonal. Because we polarize laser light we did not use the entrance polarizer increasing the transmittance by 20% to 40% (immediately behind the screen we placed a diffuser). Resolution of the screen was 1024 pixel by 768 pixels. The test hologram made: shows that holograms using this screen have at least the same resolution as holograms made using slides shot from a 20 inch CAD work-station monitor. Currently we have upgraded to LcoS display chips which increases the resolution to 1920×1200 pixels. This eliminates any visual pixilation in the hologram.

Conclusion:

We have proved that it is possible to produce 3D holograms from suitable 2D data. We used a digital 2D to 3D conversion process. With these data we showed, that it is possible to produce a convincing 3D image.

We have shown that making undistorted MPGH does not follow the rules and tricks of stereo pairs and stereo windows. Because of our approach of comparing the MPGH with a normal hologram of the object, the position of the viewer is not important for this method.

We successfully tested a high resolution LCD screen and LcoS chip as a digital interface between computer data and the holoprinter setup.


Holoprinter

Holoprinter

Holoprinter

Holoprinter

Holoprinter

Holoprinter


Click to see article HOLOPRINTER INFO DHL WALTER SPIERINGS


Click to see article ILUMINATION HOLOGRAMS
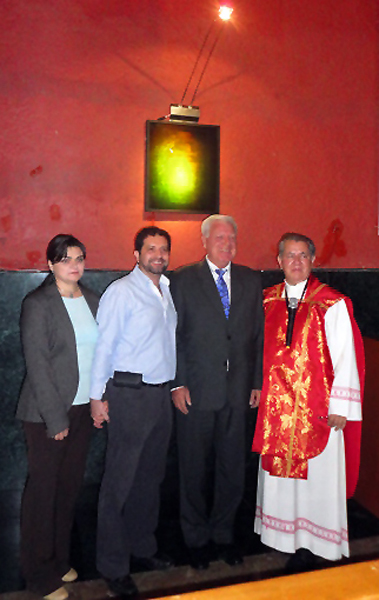
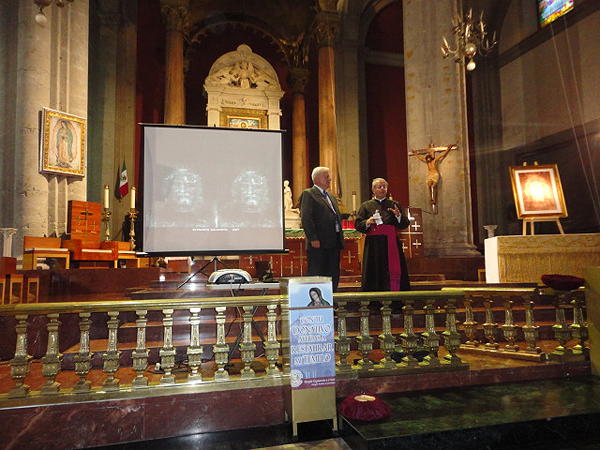
 

POWERPOINT PRESENTATION OF EXPOSITIONS CONFERENCES ETC.

This is a POWERPOINT PRESENTATION that is called:

The Shroud of Turin
Expositions, Conferences and Research
Around the world
SUBTOPIC: Research of the Tilma with the image of Our Lady of Guadalupe
Presentation by:
Dr. Petrus SOONS

This Presentation gives a good idea of some of the Presentations we did, Conferences of the Shroud, organized in different places, inaugurations of Exhibitions of The Shroud in the Americas and in Europe, in cooperation with Father Hector Guerra L.C., and research that was done, partly with Pete Schumacher in Alamogordo, NM, USA, with the VP-8 Image Analyzer on details of the image of the Shroud of Turin, but also research on photographic glass-plates with the image of the Virgin of Guadalupe, that were found in the crypt of the Old Basilica in Mexico City. This research was done in the Netherlands.

In November of 2006 during the audience in Turin with Cardenal Severino Poletto and a group of Italian Shroud scientists where I showed for the first time the life-size Holograms, the Cardenal decided that these life-size Holograms of the front and the back of the body should be placed in the Museo della Sindone in Turin. Three months later they were installed in the Museo.
During a visit to Turin in the spring of 2007 I had a meeting with Don Giuseppe Ghiberti, and he suggested to me that I should contact Father Hector Guerra L.C. He told me that since 2005 Father Guerra was involved in the realization of permanent exhibitions of the Shroud of Turin. The first exhibition was inaugurated in the Notre Dame Center, July 22nd , 2006 in Jerusalem and is a must for the pilgrims visiting the Holy Land. After that he managed to realize the next permanent exhibition in the Universitate Europeo di Roma, Regina Apostolorum and in February of 2010 the next exhibition was inaugurated in the National Shrine of OUR LADY of GUADALUPE in Sacramento-CA, USA. He had the support and cooperation of the authorities in Turin and Gian Maria Zaccone and Bruno Barberis were very helpful in the setting up of these exhibitions. I contacted Father Guerra after my return from Turin and out of that grew a friendship and cooperation. Father Guerra decided also to place the life-size Holograms of the front and the back of the body in these permanent exhibitions. The name of the exhibition is: “WHO IS THE MAN OF THE SHROUD ?”, giving the visitors all the information about the Shroud and in the end letting them decide what to believe or not.
Father Guerra inaugurated in 2010 also a travelling exhibition in Curitiba, Brasil and is preparing these travelling exhibitions also in the Netherlands and Germany-Austria and another permanent exhibition in Columbia.
Following are some photographs of some of the permanent exhibitions:

Jerusalem, Notre Dame Center

Jerusalem, Notre Dame Center

Roma

Roma

Sacramento, Cal, USA Church of Maria de Guadalupe

Sacramento, Cal, USA Church of Maria de Guadalupe

Museo della Sindone, Turin, Italy

Museo della Sindone, Turin, Italy

Holograms in exposition Panama

Holograms in exposition Panama

Face hologram, St. Patrick's Cathedral, USA

Face hologram, St. Patrick’s Cathedral, USA

Inauguration face hologram Basilica Mexico

Inauguration face hologram Basilica Mexico

Hologram in exposition in Regina Apostolorum, Rome

Hologram in exposition in Regina Apostolorum, Rome

Hologram of the front of the body in exposition Regina Apostolorum, Rome

Hologram of the front of the body in exposition Regina Apostolorum, Rome

Dr. Petrus Soons with holograms of the front and back of the body

Dr. Petrus Soons with holograms of the front and back of the body

Petrus Soons giving lecture during conference of the Shroud in Poza Rica, Mexico

Petrus Soons giving lecture during conference of the Shroud in Poza Rica, Mexico


Father Hector Guerra L.C.

Father Hector Guerra L.C.
Exhibitions of the Shroud
Conferences and Presentations

In November of 2006, during the audience with Cardenal Severino Poletto and a group of Italian Shroud scientists, where I showed for the first time the life-size Holograms of the Face and the Front and the Back of the Body, the Cardenal decided that these Holograms were going to be installed in the Museo della Sindone in Turin and three months later this was accomplished.

Cardenal Severino Poletto and Dr. P. Soons

Cardenal Severino Poletto and Dr. P. Soons

Museo della Sindone

Museo della Sindone

During a next visit to Turin in the spring of 2007, I had a meeting with Don Giuseppe Ghiberti who was in charge of Shroud affairs, and he suggested to me that I should contact Father Hector Guerra L.C.. He told me that since 2005 Father Guerra was involved in the realization of permanent exhibitions of the Shroud of Turin. The first exhibition was inaugurated on July 22, 2006 in the Notre Dame Center in Jerusalem and is a must for the pilgrims visiting the Holy Land. After that he managed to realize the next permanent exhibition in the Universitate Europeo di Roma, Regina Apostolorum. He had the support and cooperation of the authorities in Turin and Bruno Barberis and Gian Marie Zaccone had been very helpful in the setting up of these exhibitons. The name of the exhibitions was: “Who IS THE MAN OF THE SHROUD ?”, giving the visitors all the information they needed about the Shroud and in the end letting them decide what to believe or not. (see the folder of the exhibition in Jerusalem).

Exposition Jerusalem / Holograms

Exposition Jerusalem / Holograms

Inauguration Jerusalem

Inauguration Jerusalem

Exposition Rome

Exposition Rome

Exposition Rome / Holograms

Exposition Rome / Holograms

I contacted Father Guerra after my return from Turin and made an appointment in the Dutch Holographic Laboratory in Eindhoven in the Netherlands. Here we had done all the 3D investigations and a set of life-size Holograms of the Front and the Back of the Body and also the Face were present there. I introduced Father Guerra to the Director of the Lab, Walter Spierings, and to my sponsor group who had made possible all the work and the production of the Holograms and that resulted in a gift of two sets of the Holograms for the two exhibitions that Father Guerra had already inaugurated in Jerusalem and Rome. My brother Michel had supported me from the beginning. Later were added to the sponsor group Tony and Laurie Mijares from Ft. Lauderdale (USA) and Rob and Yvonne van de Voort from the Netherlands Father Guerra was very impressed by the Holograms and our knowledge of the 3D qualities of the Shroud image and out of this meeting in the Lab developed a close cooperation and friendship of me, Walter Spierings and our sponsor group with Father Guerra.
Father Guerra was very grateful for the gift of the Holograms for his exhibitions and to thank the sponsor group he organized in October of 2007 a pilgrimage to the Holy Land under his guidance. He had been stationed for three years in Jerusalem in the Notre Dame Center, so he was an ideal guide and this trip was a great success and motivated everybody to continue the cooperation.

Father Hector Guerra with sponsor group in Israel

Father Hector Guerra with sponsor group in Israel

In March of 2008 Father Guerra and me, in the company of Avinoam Danin, the Botanist from the Hebrew University in Jerusalem, who had done the work on the flower and plant images on the Shroud, visited the Turin authorities to tell about the discoveries I had done in the 3D images, the solid oval object under the beard with in relief on the surface the three Hebrew letters forming the word TS”ON, meaning the SACRIFICIAL LAMB, an important discovery. We visited also the Museo della Sindone to show Danin the Holograms. Out of this meeting developed a strong friendship with Avinoam Danin and that resulted in a close cooperation in the future.

Avinoam Danin, Dr. Soons and Turin authorities

Avinoam Danin, Dr. Soons and Turin authorities

In 2009 Tony and Laurie Mijares facilitated the installation of a new permanent exhibition of the Shroud in Sacramento, California, USA, in the church of the Virgen de Guadalupe.

Exposition Sacramento

Exposition Sacramento

Exposition Sacramento

Exposition Sacramento

Barrie Schwortz and Father Hector Guerra

Barrie Schwortz and Father Hector Guerra

After the inauguration I organized a trip in the USA and introduced Father Guerra to BARRIE SCHWORTZ in Colorado and then we traveled together to Raleigh, North Carolina where I introduced him to ALAN and MARY WHANGER and TOM D’MUHALA and RUSS BREAULT.

Alan and Mary Whanger

Alan and Mary Whanger

Father Guerra and Tom D'Muhala and wife

Father Guerra and Tom D’Muhala and wife

Tom D’Muhala showed him the collection of the photographic material from VERNON MILLER, that Vernon had donated to Tom just before he passed away and Alan showed his Image Overlay technique and also the slides of the FREY Collection that he possessed.
This Frey collection is now in the possession of Tom D’Muhala after the recent passing away of Alan Whanger.
Then we went to New York and after a meeting with the Rector of the St. Patrick’s Cathedral, he decided to install a Hologram of the Face in the Cathedral. We also visited the famous Wuenschel Collection of Shroud materials in Esopus upstate New York,, owned by the Guild of the Shroud.

Face hologram in St. Patricks's Cathedral

Face hologram in St. Patricks’s Cathedral

Father Guerra Wuenschel Collection

Father Guerra Wuenschel Collection

I was also planning to do investigations of the Tilma of the Virgen de Guadalupe in these years and had visited a couple of times Jose Aste Tonsmann who had discovered the images of people on the moment of the apparition of the Virgen in the corneas of the eyes in the image. The image of the Virgen the Guadalupe and also the image of Christ on the Shroud of Turin are considered ACHEIROPOITA or “images not made by hands (of man)”.
I organized for the first time ( in Panama ) presentations of “THE TWO LINENS” together with Jose Aste Tonsmann and when Father Guerra was notified of this, he organized a conference in the Regina Apostolorum in Rome of the two linens and invited experts on the image of the Virgen de Guadalupe and the image of Christ on the Shroud of Turin. After the conference everybody traveled to Turin to visit the OSTENZIONE of the Shroud in the Basilica of St. John. Father Hector Guerra and Avinoam Danin and our sponsor group joined us there.

The next exhibition that our group organized was in Den Bosch in the Netherlands in the Cathedral of St. John. This exhibition was very successful for three years and is now an itinerant exhibition in the Netherlands. It was sponsored by my brother Michel and Rob and Yvonne van de Voort, because being born and living in the Netherlands this was of great importance to all of them.

Exposition Den Bosch the Netherlands

Exposition Den Bosch the Netherlands

The next permanent Exhibition that was inaugurated, was in the University of Anahuac in Mexico City in Mexico in December of 2012. Father Hector Guerra was at that moment in chemo therapy, because he was diagnosed with lung cancer, but he was present for the opening, because being born in Mexico, this was very important for him. Members of his family were also present.

Inauguration exposition Anahuac, Mexico

Inauguration exposition Anahuac, Mexico


During these years Father Guerra organized also a traveling exhibition in Brasil and a permanent one in Krakow in Poland and In Lisboa in Portugal.

In June of 2013, after the success in Rome of the conference of the “TWO LINENS” Father Guerra organized this event again in Jerusalem in the Notre Dame Center and invited experts from Turin representing the Shroud of Turin and experts from Mexico representing the Tilma of the Virgin of Guadalupe. I was the only one representing both linens. Also present for the Shroud was John Jackson the organizer of the STURP investigation of 1978.

Conference of the TWO LINENS

Conference of the TWO LINENS

I visited The Shrine of the Virgin of Guadalupe again in 2013 on invitation of the Rector of the Basilica, because I had done investigations for them on very old glass plate negatives that had been found in a crypt under the old Basilica. They had asked me to install a Hologram of the Face of Jesus Christ in the Old Basilica on the side of the altar and that was done followed by a presentation of the Shroud and the investigation that had been done in the Netherlands on the beforementioned glass plate photographs.

In Panama in 2013, my wife Dalys and me, organized a very successful exhibition of the Shroud in the Chapel of Pope John in Albrook in Panama City. We had a lot of coverage of the media, written and TV and the inauguration was done by the Archbishop of Panama, Mgr. Ulloa and two bishops. This was the first time that in an exhibition we showed the set of Holograms but also a set of life-size 3D lenticulars and also the sculpture that I made in 2009-2010 based on the 3D information from all the 3D investigations that we had done with Bernardo Galmarini and the experts of the Dutch Holographic Laboratory. We also took the opportunity to organize a Shroud Conference just before the inauguration and the speakers were Bruno Barberis from Turin, Janice Bennett from Spain who had written a book about the Sudario of Oviedo, Barrie Schwortz, my good friend, Father Verar from Panama, a Shroud expert, and myself. It was the Talk of the Town in these days in Panama where we live.

Inauguration exposition Panama

Inauguration exposition Panama

Two holograms exposition Panama

Two holograms exposition Panama

Fascimil Shroud and Sculpture

Fascimil Shroud and Sculpture

Our cooperation with Father Guerra continued, although his health was deteriorating and in June of 2015 we visited him in Madrid in Spain and spent precious time with him and he passed away on December 11, 2015 on the eve of the day of the Virgen the Guadalupe.
Just after that we received the message that the next day on December 12 our very good friend Avinoam Danin, who wrote the book “BOTANY OF THE SHROUD”, also passed away.
May they both rest in peace R.I.P.

End of 2016 friends of ours from Honduras contacted us. They had visited the exhibition of the Shroud in Panama and wanted to organize an exhibition in Tegucigalpa and San Pedro Sula in Honduras and knowing that we had quite some experience in organizing the exhibitions and also because we still had a lot of the 3D materials in our possession, they asked us to help with the organization. This worked out very positive and successful and their exhibition was one of the most professional and beautiful I have ever seen in these two cities in Honduras. Bruno Barberis and me were the guest speakers and we gave for ten days, two times a day our presentations.

Exposition Honduras

Exposition Honduras

Exposition Honduras

Exposition Honduras

Dr. Soons, Bruno Barberis and group of volunteers

Dr. Soons, Bruno Barberis and group of volunteers

Presentation Dr. Soons

Presentation Dr. Soons

We continue with our Shroud work and have given the last 15 years lots of presentations in Panama where I live, Latin America (I speak fluent Spanish), USA and Europe in churches, schools and in many different places and our 3d work is exhibited in Musea, permanent exhibitions and in churches.

Sculpture Christ in church Panama

Sculpture Christ in church Panama

Presentation school Panama

Presentation school Panama

POWERPOINT PRESENTATION OF EXPOSITIONS CONFERENCES ETC.

This is a POWERPOINT PRESENTATION that is called:

The Shroud of Turin
Expositions, Conferences and Research
Around the world
SUBTOPIC: Research of the Tilma with the image of Our Lady of Guadalupe
Presentation by:
Dr. Petrus SOONS

This Presentation gives a good idea of some of the Presentations we did, Conferences of the Shroud, organized in different places, inaugurations of Exhibitions of The Shroud in the Americas and in Europe, in cooperation with Father Hector Guerra L.C., and research that was done, partly with Pete Schumacher in Alamogordo, NM, USA, with the VP-8 Image Analyzer on details of the image of the Shroud of Turin, but also research on photographic glass-plates with the image of the Virgin of Guadalupe, that were found in the crypt of the Old Basilica in Mexico City. This research was done in the Netherlands.

Click to see POWERPOINT PRESENTATION OF EXPOSITIONS CONFERENCES

Click here to see THE FOLDER EXPOSITION IN JERUSALEM


Father Hector Guerra L.C.

Father Hector Guerra L.C.


IN COMMEMORATION OF THE COOPERATION WITH FATHER HECTOR GUERRA, ESPECIALLY DURING THE YEARS 2007 TILL 2015

THIS IS THE TEXT OF THE FOLLOWING POWERPOINT PRESENTATION

1) PILGRIM JOURNEY TO ISRAEL OCTOBER 2007. Organized by Father Hector Guerra L.C., to thank the sponsors of the expositions of the Shroud of Turin and the donation of the sets of holograms for different expositions.

2) VISIT TO TURIN AUTHORITIES in March of 2008, in Company of Botanist Avinoam Danin and Father Hector Guerra L.C.

Barrie Schwortz and Father Guerra

Barrie Schwortz and Father Guerra

Dr. Soons, A. Danin + group Turin

Dr. Soons, A. Danin + group Turin

Father Guerra, Dr. Soons, A. Danin in Museo Della Sindone

Father Guerra, Dr. Soons, A. Danin in Museo Della Sindone

3) INAUGURATION OF THE PERMANENT EXPOSITION OF THE SHROUD OF TURIN IN SACRAMENTO, CALIFORNIA, USA, sponsored by TONY and LAURIE MIJARES from Fort Lauderdale, USA.

Father Guerra, Martine Ferre, Dalys Soons, Laurie Mijares 

Father Guerra, Martine Ferre, Dalys Soons, Laurie Mijares 

After the inauguration Father Guerra and Dr. Soons visited in the USA Barrie Schwortz in Colorado (foto 8), Alan and Mary Whanger in Durham and Tom D’ Muhala in Raleigh (N.C.)(foto 9), Pete and Susan Schumacher in Alamogordo (foto 4) and the Shroud Museum in Esopus (foto 10).

Foto 8 - Barrie Schwortz and Father Guerra

Foto 8 – Barrie Schwortz and Father Guerra

Foto 9 - Father Guerra and Tom D'Muhala

Foto 9 – Father Guerra and Tom D’Muhala

Foto 4 - Visit to Pete and Susan Schumacher

Foto 4 – Visit to Pete and Susan Schumacher

Foto 10 - Museum in Esopus

Foto 10 – Museum in Esopus

4) CONFERENCE IN THE REGINA APOSTOLORUM OF THE TWO LINENS IN ROME, THE SHROUD OF TURIN AND THE IMAGE OF THE VIRGIN OF GUADALUPE in September of 2010.

Dr. Soons and the group from Mexico

Dr. Soons and the group from Mexico

5) Followed by a VISIT to the OSTENZIONE OF THE SHROUD IN TURIN in the company of the Botanist Avinoam Danin, the sponsorgroup and Father Hector Guerra L.C., September 2010.

Dr. Soons, Father Guerra, Avinoam Danin in the Museo Della Sindone

Dr. Soons, Father Guerra, Avinoam Danin in the Museo Della Sindone

6) INAUGURATION OF THE PERMANENT EXPOSITION OF THE SHROUD OF TURIN IN THE UNIVERSITY ANAHUAC OF THE LEGIONAIRS OF CHRIST IN MEXICO CITY in December of 2012. Father Hector Guerra was under chemo-therapy treatment but attended this inauguration that, being born in Mexico, was very important for him. Members of his family were also present.

Mrs. Dalys Soons, Dr. Soons, Mrs. Ferre, Father Guerra University of Anahuac, Mexico City

Mrs. Dalys Soons, Dr. Soons, Mrs. Ferre, Father Guerra
University of Anahuac, Mexico City

7) INAUGURATION OF THE EXPOSITION OF THE SHROUD OF TURIN IN THE CATHEDRAL OF ST. JOHN IN DEN BOSCH IN THE NETHERLANDS JUNE 2012. Sponsors of this exposition were Rob and Yvonne van de Voort, and Michel and Donny Soons from the Netherlands.

Dr. Soons and Father Guerra and sponsor group Dr. Soons and Father Guerra and sponsor group

Dr. Soons and Father Guerra and sponsor group


8) CONFERENCE OF THE TWO LINENS, THE SHROUD OF TURIN AND THE IMAGE OF THE VIRGIN OF GUADALUPE IN JERUSALEM, ISRAEL , IN JUNE OF 2013. Present were specialists and investigators from Italy, from Mexico, the USA and Panama.

Participants conference Jerusalem

Participants conference Jerusalem

Dr. Soons, Barrie Schwortz, Paolo Di Lazaro

Dr. Soons, Barrie Schwortz, Paolo Di Lazaro

Father Hector Guerra and Botanist Avinoam Danin in The Notre Dame Center

Father Hector Guerra and Botanist Avinoam Danin in The Notre Dame Center

9) VISIT OF DALYS AND PETRUS SOONS TO FATHER HECTOR GUERRA IN MADRID, SPAIN, IN JUNE OF 2015

10) FATHER HECTOR GUERRA PASSED AWAY ON THE EVENING OF DECEMBER 11, 2015. R.I.P.

Click to see article GUERRA IN MEMORIAM


Click to see PRESENTATION ROMA 2016 FATHER GUERRA


The holographic and anaglyph images that we produced in 2006 and 2007 are still being investigated. One has to be very careful with the interpretations. To give some examples where we found 3D reliefs in the images and are looking for an interpretation of what that could be, look at the photographs:

Figure 1. Image of rope (?) photo rigth side

Figure 1. Image of rope (?) photo rigth side ANAGLYPH 3D glasses

Figure 2. Same area rope (?)

Figure 2. Same area rope (?) ANAGLYPH 3D glasses

1) Figure 1 shows the region of the hands. In the wrist area of the anatomical left hand, between the wrist-wound and the metacarpalia (mid-hand bones) that are visible, we can see a 3D relief, that looks like a rope. That would show that the wrists were bound together here and that the arms were not tied to the body. Figure 2 is an anaglyph photo of the same region (use the 3D glasses) This is of course not a final explanation!!
2) Figure 3, shows also a 3D relief on top of the fingers of the left anatomical hand where parts of the fingers are not visible. This has the shape of a little bottle, upside down, with a tap (ampulla). Again, this is only to show that there are abnormalities in the 3D image, but we do not pretend to have a final explanation.
3) Figure 4 shows the same region with now a different explanation. This time we drew the 3D relief in the shape of a flower on top of the ampulla. Again, this is not a final explanation, it is a possibility.

Figure 3. Flower (?) on top of ampulla 

Figure 3. Flower (?) on top of ampulla 

Figure 4. Ampulla (?) on top of fingers

Figure 4. Ampulla (?) on top of fingers


Of great interest in the 3D studies are the image-less areas, for example: under the beard, in the area under the solid oval object with the three letters (See figure 5, Anaglyph image use 3D glasses), the sides of the face (see 3.4 Barrie Schwortz and 6.11 Avinoam Danin for explanation), the areas around the hands and the lower parts of the arms, the sides of the upper legs, especially the right anatomical upper leg, and the lower parts of the legs.

Figure 5. Imageless area in region under solid oval object

Figure 5. Imageless area in region under solid oval object

We know from the STURP investigations in 1978 (Adler c.s.), that under the blood spots there is no image. We know also from the investigations of the Israeli botanist Prof. Avinoam Danin, that there are present flower- and plant images on the Shroud and also on the body- image. It is realistic to state, that the formation of the body-image was seemingly blocked by the presence of the blood and the flowers. That means also that whatever “energy” or process that formed the image, that this “energy” seemingly originated from the inside of the body (or the surface) in an up-downward direction (collimated) and was blocked by the presence of solid objects like the blood, flowers or plants.

So, for the 3D investigations the image-less areas are of the utmost importance, because the question is basically: Was there something solid present in these image-less areas, that blocked the formation of the body-image? And if so, can we see in the 3D what that was?
So, the research is only beginning, and we are developing more sophisticated 3D techniques of 3D conversion and imaging.

An interesting discovery when doing the 3D research is the following: When Bernardo Galmarini, the 3D specialist from Argentina, started with the conversion of the image from 2D to 3D, he first took away the bloodspots in a complete “layer”, because these bloodspots contained a lot of “digital noise” but no 3D information in their grayscale. They were probably formed by direct contact between the wounds and the linen, so they were not part of the grayscale of the image. After finalizing the conversion to three dimensions, this layer, containing the bloodspots was carefully repositioned on top of the 3D image of the body and it was interesting to note that they ended up anatomically correct. The blood in the hair for example, ended up again IN the hair and not on the side of the face, where some investigators concluded that they should have been. (see again figure 5, USE 3D GLASSES)

So, basically we are still in the research stage and hope to use more sophisticated 3D techniques to do the next part of the research.


FINDINGS IN THE THREE DIMENSIONAL MATERIALS,
HOLOGRAMS, LENTICULARS and ANAGLYPH PHOTOGRAPHS.


A) CONFIRMATION OF MANY OF THE PREVIOUS FINDINGS, for example:

++ The position of the head, bent forward and a little bit to the right side. ++++The location of the bloodspots and the blood flows on the lower arms and back.
++The abrasions on the right shoulder, the right knee and the left scapula. ++The asymmetrical position of the body, with the right buttock lower than the left, caused by the position of the bent left leg and the less bent right leg. ++The right shoulder lower than the left shoulder, possibly due to dislocation of the humerus during the breaking of the rigor mortis of the right shoulder. ++It shows also that the body was in rigor mortis, at the moment that it was taken from the cross. The abnormal position of the legs, feet and arms, the stiffness of the buttocks and the elevated thorax and the position of the head are clear signs of this rigor mortis.
++The position of the lance wound between the 5th and 6th ribs and the blood flow coming from this wound and continuing to the back of the body. ++The different swellings in the face and the dislocation between the boney and cartilaginous parts of the nose. ++The two solid objects on top of the eyelids (coins).


B) NEW FINDINGS THAT WERE DONE STUDYING THE HOLOGRAMS:

THE PHOTOGRPAHS MARKED WITH ANAGLYPH, ARE ANAGLYPH PHOTOGRAPHS AND YOU NEED 3D GLASSES
1) THE POSITIONS OF THE FEET AND THE LEGS were never clearly visible in the 2D photographs. The holograms gave a unique opportunity to see this in 3D and to reveal that both legs were bent with the left leg more than the right one and partly covering the right leg, caused by the fact that the left foot was positioned on top of the right foot in a X-way (diagonal) fashion, causing the left leg to be bent more in the knee than the right leg. In the holograms, the toes of both feet are visible. The toes of the left foot sticking out on the side of the right foot. The conclusion was that the Romans put the sole of the right foot against the stipes (vertical beam), crossed the left foot on top of the right foot (diagonal) and fixed both feet with one large nail to the vertical beam of the cross. (See picture 1 and 2) picture 2 is ANAGLYPH.

Picture 1. Position feet backside

Picture 1. Position feet backside

Picture 2. Position feet on front image

Picture 2. Position feet on front image

2) On the 2D photographs a bloodspot appears to be floating above the area of the head. The holograms clarified that this BLOODSPOT was actually ON TOP OF THE HEAD. There are more bloodspots all around the head area, indicating that the crown of thorns was more helmet-like than only circular. (See picture 3). Picture 3 is ANAGLYPH.

Picture 3. Bloodspot on top of the head

Picture 3. Bloodspot on top of the head

3) WHIP MARKINGS FOLLOW THE CURVATURE OF THE BODY. In the holographic images, the marks caused by the dumb-bell shaped objects on the end of the leather strings (or ropes) of the Flagrum Taxulatum (whip) follow the curves of the sides of the upper and lower legs, as well as the shoulders and buttocks. On the 2D on the upper and lower legs, the shoulders and the abdomen and in the 2D photographs they look straight. This cannot be the result of the work of a painter. (See picture 4).

Picture 4. Whip markings folowing curvature of body

Picture 4. Whip markings folowing curvature of body

4) In the holograms we can clearly see the presence of TWO SMALL SOLD OBJECTS on top of the eyelids. There were however no more details visible on the surface. These objects are believed to be small coins (leptons) minted between 29 to 34 CE. (See picture 5). Figure 5 is ANAGLYPH.

Picture 5. Solid objects on eyelids

Picture 5. Solid objects on eyelids

5) In the holograms the POSITION OF THE ARMS is clearly visible. They are not in the position that you would normally expect, on the side of the body. The arms appear to be rigid and oriented in an almost horizontal plane. The elbows are not inclined downwards, they rather seem to lie in this horizontal plane together with the lower arms, The anatomical left lower arm shows the elbow higher than the left hand, which is crossed over the right hand with a natural bending of the fingers . The right wrist is under the left hand on top of the space between the two upper legs. The right hand angles upward following the curvature of the upper left leg. The left hand is bent at the wrist and the fingers are in a downward direction. This position of the arms is a strong indication of rigor mortis, and that this rigor was broken in the shoulders and the elbows. (See picture 6) Picture 6 is ANAGLYPH.

Picture 6. Position arm in horizontal plane

Picture 6. Position arm in horizontal plane

6) RIGOR MOTIS. The position of the arms is a strong indication of rigor mortis, as mentioned. Other signs of rigor mortis that are visible in the holograms are the abnormal raising of the chest area (thorax). The chest appears to be inclined in an upward position with respect to the pelvis area and abnormally expanded. Other signs are the head that is bent slightly forward and turned a little bit to the right anatomical side. The buttocks which are very tense, showing a total contraction of the muscles, although the weight of the body is very pronounced in that area, which would have caused a flattening of the buttocks. (See picture 7). ANAGLYPH.

Picture 7. Position buttocks rigid

Picture 7. Position buttocks rigid

7) During the investigations of the holograms we also found a ROPE-LIKE SHAPE over the left wrist and a relief in the shape of a little ampulla near the fingers of the right hand. Maybe there was the presence of a rope that was used to keep the arms in a fixed position. However more research is needed to confirm these findings! (See picture 8). ANAGLYPH.

Picture 8. Rope (?) near 

Picture 8. Rope (?) near 

8) On the back of the head we can see that part of the long hair has the shape of a PONY TAIL. (See figure 10).

9) According to some researchers the blood in the hair on the sides of the face originates from the cheek areas. Before the conversion process from 2D to 3D the bloodspots were taken away (because they do not contain the grayscale of the image). When the conversion was completed, the layer (matrix) containing the exact position of the BLOODSPOTS was put on top of the 3D image and the bloodspots on the sides fitted nicely IN THE HAIR, even following on the anatomical right side the natural curving of the hair that is visible in the image. (See picture 11). Picture 11 is ANAGLYPH.

Picture 11

Picture 11

10) Looking at the holograms side-by-side of the front and the back of the body, it is obvious that we see here a bas-relief of the front part of the body and a bas-relief of the back part of the body. However, by estimating the depth of both bas-reliefs, it is evident that a “layer” of the middle part of the body is “missing” and there is an absolute absence of body-information of this part of the body. The missing layer is about 3” to 4”.Now if you measure on the Shroud the distance of the top of the head-front-image to the top of the head-back-image you see that that is about the same distance. MORE ABOUT THIS MISSING LAYER OF THE BODY IN THE CHAPTER OF IMAGE FORMATION—– CHAPTER ISABEL PICZEK.
11) IMAGE-LESS AREAS IN THE GRAYSCALE OF THE IMAGE. When converting the grayscale of the image from 2D to 3D we found that there were image-less areas that did not contain any information. These areas in the body-image showed up as “holes” in the 3D image. For example looking at the face you could see these areas on the anatomical right side of the face, multiple areas on the front of the head, also some on the left side of the face, in the middle of the beard and the right side of the moustache and on the abdomen around the lower arms and the hands. (See pictures 12 and 13). Prof. Avinoam Danin, Botanist, found later that these areas were covered by flowers. FOR MORE ON THIS SUBJECT, GO TO CHAPTER AVINOAM DANIN, HOLES IN THE IMAGE. Picture 12 is ANAGLYPH.

Picture 12 Imageless areas

Picture 12 Imageless areas

Picture 13. Imageless areas covered with flowers

Picture 13. Imageless areas covered with flowers

12) In the holograms we found that under the beard in the neck area of the frontal image there is the presence of A SOLID OVAL-SHAPED FLAT OBJECT, measuring about 4.5 by 2.5 inches. In May of 2010 the presence of this solid object was scientifically confirmed by research done by Pete Schumacher with the VP-8 Analyzer. In my investigations I found that on the surface of this object there seems to be three Hebrew letters in relief. This is my PERSONAL observation. (See figures 14, 15 and 16). These figures 14 and 15 show images of the VP-8 Image Analyzer and a solid object under the beard, which is visible in figure 16.

Picture 14. Solid oval object under beard (VP-8)

Picture 14. Solid oval object under beard (VP-8)

Picture 15 Solid oval object under beard (VP-8)

Picture 15 Solid oval object under beard (VP-8)

Picture 16 Tree hebrew letters on top solid object

Picture 16 Tree hebrew letters on top solid object

FOR MORE ON THIS SUBJECT GO TO THE CHAPTERS—-OVAL SOLID OBJECT (6.3) and—-LETTERS (6.4).


WHAT IS HOLOGRAPHY ?

Holography is a technique, which allows the recording and playback of true three-dimensional images. The produced image is called a hologram. The playback provides an image in light that can be viewed in different angles and is an exact copy of the original 3D object.

The inventor of holography was a Hungarian-born electrical engineer DENNIS GABOR, who won the Nobel Prize for Physics in 1971 for his invention. He developed the idea of holography in 1947, while working on improving the electron microscope. The basic idea was, that for perfect optical imaging, the total of all the information has to be used, which means, not only the amplitude of the light-wave as in usual optical imaging, but also the phase. In this manner a complete holo-spatial picture can be obtained. In 1947 coherent light sources were not available, and the conventional light sources generally provided too little light, or light that was too diffuse to obtain good results (DISPERSION of the light used). In May of 1960 THEODORE MAIMAN at Hughes research Laboratories built the first laser, pulses of red light coming from a ruby cylinder that was put inside a very bright flash lamp with a helical shape. Maiman later received also a Nobel Prize for Physics, together with Townes and Schawlow, for the development of the laser theory in 1958 (see figure 1 and figure 2).

Fig. 1 Dennis Gabor

Fig. 1 Dennis Gabor

Fig. 2 Theodore Maiman

Fig. 2 Theodore Maiman

LASER means: Light Amplification by Stimulated Emission of Radiation. This is a process for emitting electromagnetic radiation, typically light or visible light, via the process of stimulated emission. The emitted LASER light is usually a spatially COHERENT, narrow low-divergence beam, which can be manipulated with lenses (like in holography). In laser technology, COHERENT LIGHT denotes a light source that produces light waves of IDENTICAL FREQUENCY, PHASE and POLARIZATION. This also means that a laser beam has a precise mathematical property and can carry a large amount of intelligent information. When T. MAIMAN had produced the first laser, then the stage was set for the production of the first three-dimensional images and in 1960 the researchers LEITH and UPATNIEKS of the University of Michigan created the first off-axis laser transmission holograms followed around the same time by Yuri DENISYUK of the Soviet Union, who created reflection holograms that one could see using ordinary white light.

HOLOGRAMS HAVE UNIQUE CHARACTERISTICS:

1) On the same holographic (photographic) film one can record multiple scenes, images of 3D objects, on the not yet developed film. It depends on the angle under which the reference beam hits the film and creates the interference pattern with the object beam. All these different scenes can be called up, by aiming a laser beam on the photographic film, under the same angle as the reference beam that was being used.
2) When you create a cylindrical hologram, you can see the original 3D object in a 360 degree view.
3) You can copy the Master hologram with the reference beam reflecting from the Master on a new photographic film and the result will be a positive image, exactly the same as the image produced by the original Master.
4) When a light wave hits the Master holographic film, it acts as a (diffractive) filter, allowing some light to pass through and pick up the imprint in the medium. However, unlike a photographic image, it is the interaction of the new light wave with the recorded interference pattern that is seen as a 3D image. It is 3D because the new light wave becomes modified by the wave-interference pattern recorded in the emulsion and appears thereby as the original light wave emitted by the object itself.
5) When the light wave hits the Master holographic medium and reflects from this film, this will contain the information originally recorded, multiplied by the intensity of the new light beam. This will be seen by the observing eye as a VIRTUAL image reconstructed in space and as a focused REAL image appearing inside the witnessing eye or out in space just in front of it. A virtual image is the kind of image that you see when you look at yourself in the mirror, and the image appears to be behind the glass, while a real image is what you see when the image can be projected for instance on a screen, because the rays converge to focus the image.
6) Each piece of the hologram contains the interference pattern produced by adding the reference wave to the object (information) wave. Each point on the object wave acts as a tiny sender of spherically distributed information waves, and these waves hit all points on the surface of the recording medium together with the reference wave. This means that every tiny piece of the recording medium contains information from all points on the surface of the 3D object.

This is where the idea of “the part contains the whole” comes from. However, as , the hologram size reduces, when you break it up in pieces, the result will be that
the tiny pieces will show a loss of image perspective, resolution and brightness.

To understand the process of making a hologram, the term INTERFERENCE is very important, and in the case of holography we talk about the interference of light waves. What it means is the addition (superposition) of two or more waves which results in a new wave pattern. Although INTERFERENCE is a characteristic behavior of light, it is not solely an optical phenomenon. Interference also occurs between sound waves, as well as waves induced in a standing pool of water. A very nice and easy interference experiment can be performed, using a swimming pool and two stones. First let the water become very still, than simultaneously let two persons throw the stones into the water from opposite sides of the pool. Just as with light waves, the two stones will produce a series of waves in the water from opposite sides of the pool going in all directions. The waves that were formed in the area between the spaces where the stones entered the water will eventually collide. Where they collide in step, they will constructively add together to make a bigger wave and where they collide out of step, they will destructively cancel each other out. The resulting wave pattern is called an INTERFERENCE pattern.
Holography is entirely dependent on the interference of light waves to create its three-dimensional effects. In transmission holograms, both a reference and an object beam (reflecting from the 3D object) are reflected on a holographic (photographic) film from the same sides. These beams interfere to produce light and dark interference wave field areas (see figure 3 and figure 4) and this interference pattern contains ALL the information of the original 3D object. The aim in holography is to record the complete wave field on the recording holographic film. This includes both amplitude and phase information.

Fig. 3 Interference pattern

Fig. 3 Interference pattern

Fig. 4 Interference pattern

Fig. 4 Interference pattern

Java demonstration of interference: http://www.falstad.com/ripple/ex-2source.html
Or from the same site: http://www.acoustics.salford.ac.uk/feschools/waves/super2.htm

fig. 5 Object and Reference beam

fig. 5 Object and Reference beam

Figure 5, shows on the right upper side a laser beam that is split in two beams of monochromatic light by a beam splitter. One beam called the “REFERENCE BEAM” is projected via mirrors and a diffuser onto a special photographic film (the recording medium). The second beam, called the “OBJECT BEAM” is projected via an expander lens onto the object and its reflection is also captured on the same photographic film.

The result is a photographically captured INTERFERENCE PATTERN that will look like the Figures 3 and fig. 4. An interference pattern captured in this way on the special photographic film is called a “MASTER”.
From this MASTER we can now create holograms in two different ways:
1) The reference beam is projected on the Master under the same angle that was used to create the Master but directed from the opposite side as from where it was during the recording. The result will be that the 3D object is now floating in the air in front of the Master. This recreated image has all the qualities and details of the original 3D object, but it is composed of LIGHT (see figure 6). It is called a real image.

fig. 6 Apple floating in the air

fig. 6 Apple floating in the air

2) The reference beam is again projected onto the Master under the same angle that was used to create the Master. Then the reflection is captured on another special holographic (photographic) film which has also a reference beam and the result will be a true copy of the hologram with the image straddling the holographic plate. (see figure 7).

fig. 7 Producing copy of Master Hologram

fig. 7 Producing copy of Master Hologram

With this knowledge we can now describe the process that was used in the DUTCH HOLOGRAPHIC LABORATORY (DHL) in Eindhoven in the Netherlands (Director WALTER SPIERINGS, www.holoprint.com) for the reconstruction of the 3D-image of the Shroud data with holography. Like we have told before, using digitized copies of the ENRIE photographs of 1931, the 3D information was extracted by means of grayscale mapping by BERNARDO GALMARINI in Buenos Aires, Argentina. This 3D information was then used to calculate a series of views. We made several views of this 3D model and then we generated an ANAGLYPH image which made viewing in 3D possible using red and cyan glasses. Seeing that the result was very good, this convinced us to continue and much more sophisticated methods were developed.
A virtual camera moves in a horizontal line past the 3D model (in the computer). Between the center view and the most left and right image all the other images were interpolated until a total of 625 virtual camera shots. These sequences were the basic information that the technicians in the DHL needed to produce the Master hologram. This was done in their Holographic Laboratory using the DFCH Holoprinter (developed by DHL). This Holoprinter employs a LcoS-chip (1920 x 1200 pixel resolution). See Figure 9.

fig. 9 Holoprinter

fig. 9 Holoprinter

In 2006 life-size holograms of both the front and the back images were produced of 200 x 100 cm by a Canadian Company, with each square mm built up of 1024 x 768 pixels. They chose to use the one step process, because it is an easier way of producing large size holograms (see Figure 13, 14, 15).

fig. 13 Life Size Hologram Exposition Sacramento

fig. 13 Life Size Hologram Exposition Sacramento

fig. 14 Life Size Hologram Exposition Sacramento

fig. 14 Life Size Hologram Exposition Sacramento

fig. 15 Dr. P. Soons in front of Life Size Holograms

fig. 15 Dr. P. Soons in front of Life Size Holograms


Figure 8 shows how the technicians of the Holographic Laboratory created the Master with a computer-generated object beam, that contains all the before mentioned 3D information, (the 625 virtual camera shots). The result was then a perfect and very detailed Master Hologram.

fig. 8 Computer generated Master Hologram

fig. 8 Computer generated Master Hologram


Information about the DUTCH HOLOGRAPHIC LABORATORY you can find in the following websites and also some sites that refer to articles about Holography written by WALTER SPIERINGS, the Director of DHL (founded in 1983), in Eindhoven, the Netherlands. See figures 10, 11 and 12.

fig. 10 Walter Spierings Director DHL

fig. 10 Walter Spierings Director DHL

fig. 12 Spierings with Face Hologram on wall

fig. 12 Spierings with Face Hologram on wall

fig. 11 First Face Hologram

fig. 11 First Face Hologram

http://www.holoprint.com
http://www.holoprint.com/articles/leonardo/leonardo.html
http://www.holography.co.uk/Conference/Spierings/Walter.pdf
http://www.nvpt.nl/files/97-3-005.pdf
http://www.cgw.com/Publications/CGW/2008/Volume-31-Issue-7-July-2008-/Dimensional-Art.aspx

Other links that are useful:

http://science.howstuffworks.com/hologram.htm
http://holoworld.com
http://en.wikipedia.org/wiki/Holography

To get an idea of the HOLOPRINTER that was used to create the Master, Walter Spierings and Dr. Petrus Soons wrote an article with technical information in 2007, explaining the mathematics behind the process under the title:
“ 3D IMAGE RECONSTRUCTION OF SHROUD OF TURIN DATA WITH HOLOGRAPHY”
“THE HOLOPRINTER”
You will find this under No: 5.2
This article was written for the Turin Shroud Authorities, after they placed life-size Holograms of the front and the back image of the Shroud of Turin in the Museo della Sindone in Turin (see Figure 16) and was personally handed over to Don Giuseppe Ghiberti, Bruno Barberis and Nello Ballosino in the spring of 2007.

fig. 16 Set of Holograms Museo della Sindone Turin

fig. 16 Set of Holograms Museo della Sindone Turin


Click to see article DHL WALTER SPIERINGS CURR


WALTER SPIERINGS with lenticular Virgen de Guadalupe

WALTER SPIERINGS with lenticular Virgen de Guadalupe